The 7 Phases of a Home Renovation (and What to Track)
Every home renovation moves through the same seven phases, whether it's a single bathroom or a whole house. Knowing the sequence — and the one or two things that actually matter to track in each phase — is what separates a project that stays on plan from one that drifts.
Ask ten homeowners how a renovation works and you’ll get ten different stories. Ask ten builders and you’ll get one: every project, from a single bathroom to a whole-house gut, moves through the same seven phases in the same order. The scale changes. The sequence doesn’t.
Knowing those phases does two things. It tells you what’s coming next, so you’re never blindsided. And it tells you the one or two things actually worth tracking at each stage — because the metric that matters in week one (have I defined the scope?) is not the one that matters in week ten (am I drawing down contingency too fast?). Track the wrong thing at the wrong time and the project drifts while your spreadsheet looks fine.

Here are the seven phases, in order, and what to keep your eye on in each.
Phase 1: Planning and vision
This is the cheapest phase to get right and the most expensive to get wrong, because everything downstream inherits the decisions made here. Phase 1 is where you turn “we want to do up the kitchen” into a concrete, written scope: what’s changing, to what standard, and — just as important — what isn’t changing.
The work here is mostly thinking and writing. Walk the space, list every change room by room, collect inspiration, and be honest about the finish level you’re aiming for. “Rental neutral” and “forever home” can differ by three times on the identical floor area, so naming that level now stops a thousand small arguments later.
What to track: the scope itself, and your decisions. Write down what’s in and what’s out, and the reasoning behind each choice — because in month three, when someone asks “weren’t we going to move that wall?”, the written record is what settles it. The single most valuable artefact from this phase is a scope freeze: the line after which any addition becomes a deliberate, costed change rather than a casual “while we’re at it.”
Phase 2: Budgeting and financing
Once you know what, you can work out how much — and how you’ll pay for it. This is where a vague vision meets real numbers, and where most projects quietly set themselves up to overrun before a single tradesperson is booked.
The mistake almost everyone makes is budgeting from a single lump-sum guess (“kitchen — $25,000”) instead of building the number up from itemised costs. A real budget is assembled line by line, grouped into categories, with a contingency sized to the age and condition of the home. There’s a full method for this in our guide on how to budget a home renovation without going over, but the headline is: the construction quote is usually only 60–70% of the true project cost. The rest hides in permits, design fees, disposal, finance, fixtures, and the finishing layer.
What to track: an itemised budget with a ring-fenced contingency line. Per category, per line item — not one big number. If you want a structure that already includes the costs people forget, our free renovation budget template is built for exactly this phase.
Phase 3: Design and permits
Now the vision becomes drawings, specifications, and — where the work is structural or changes the building’s use — formal permissions. Depending on where you live and what you’re doing, this phase can be a quick afternoon of choosing finishes or a months-long wait for council approval.
This is the phase people consistently under-budget on time. Permit approval and structural sign-off happen on the authority’s schedule, not yours, and you usually can’t start meaningful work until they’re cleared. Build realistic lead times in now, before you’ve promised yourself a finish date.
What to track: the decisions and specifications (which tile, which layout, which spec of window) and the status of every permit or approval. A renovation that starts before its permits are clear is one stop-work order away from an expensive delay.
Phase 4: Hiring and contracts
With drawings in hand, you can get accurate quotes and choose who does the work. For each major trade, get three itemised, written quotes — not ballpark phone numbers — so you can compare like for like and spot what one contractor included that another quietly left out.
This is also the phase to get everything in writing. The U.S. Federal Trade Commission’s guidance on hiring a contractor makes the point bluntly: agree the payment schedule, the scope, what’s included, and what isn’t, all in writing, before work begins. A handshake and an optimistic verbal estimate is how disputes start.
What to track: quotes (so you can compare and hold contractors to their numbers), contracts, the agreed payment schedule, and key contacts. When phase 5 gets chaotic, knowing exactly what you agreed and what you’ve paid is what keeps you in control.
Phase 5: Demolition and construction
The loud, dusty, visible phase — and, on the calendar, usually the longest. Walls come down, services go in, the structure takes shape. It feels like the main event, and in terms of effort it is. But here’s the thing most homeowners learn the hard way: the outcome of phase 5 was largely decided in phases 1–4. A complete scope, a real budget, clear drawings, and a solid contract are what make the build boring in the good way.
What this phase demands is live tracking, because this is where the budget either holds or leaks. Costs get committed daily, changes get requested on the spot, and the gap between “the plan” and “what’s actually happening” opens up fast if nobody is watching it.
What to track:
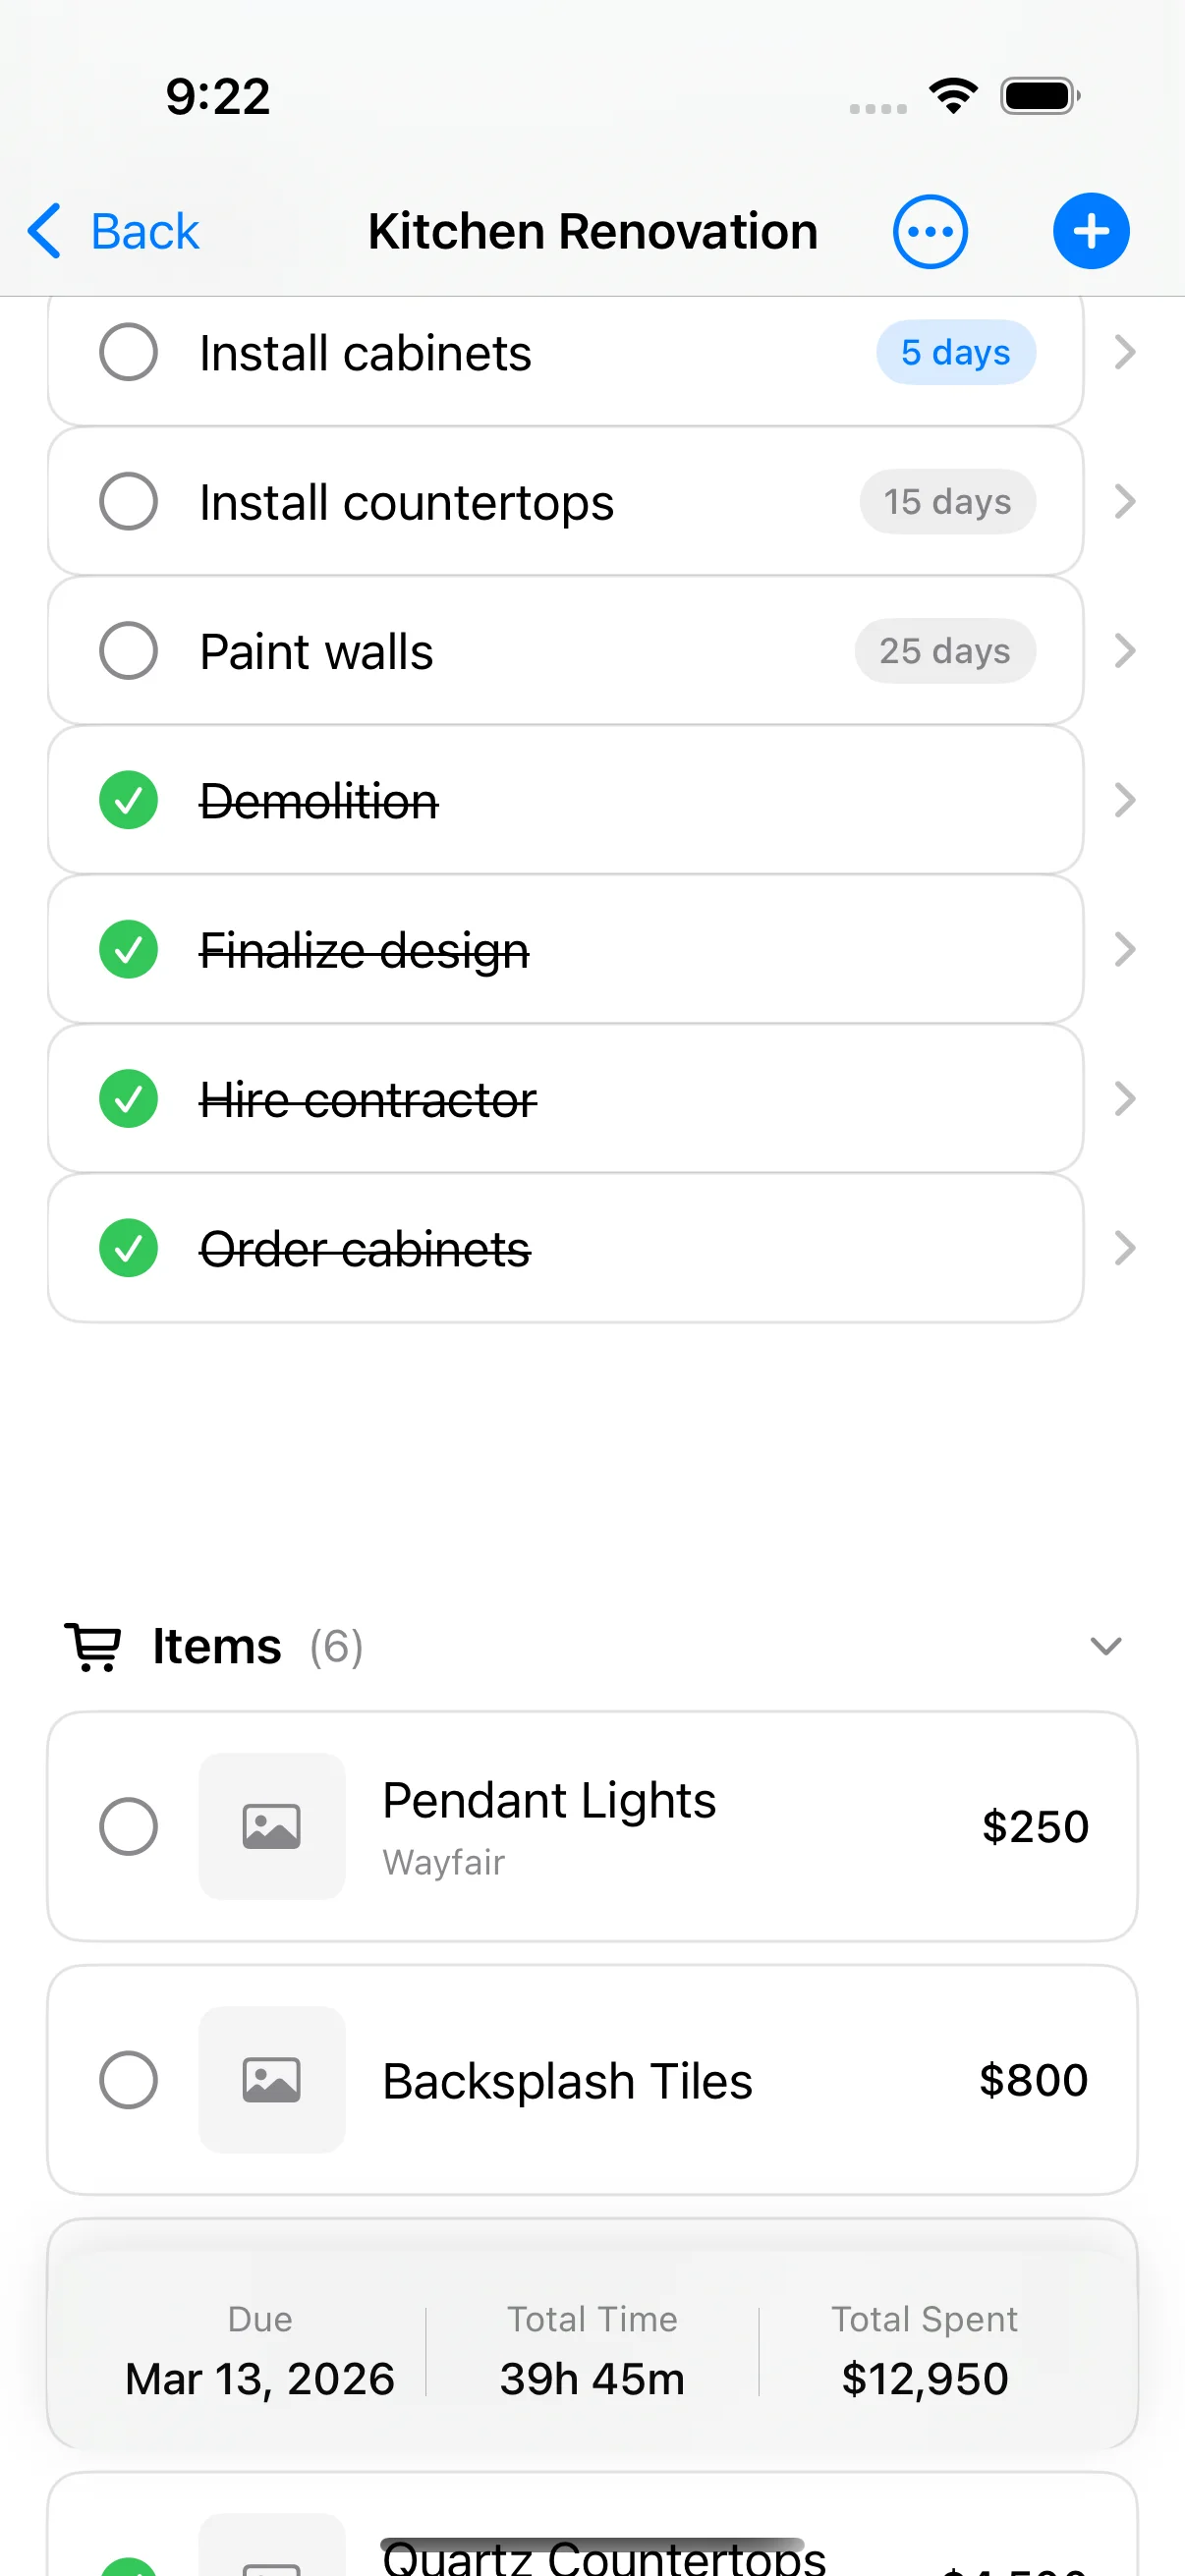
- Actual spend against estimate, per line item, every week. Caught early, an overrun is recoverable — tiling $600 over in week four leaves you eleven weeks to trim elsewhere. Found at handover, it’s just a hole.
- Change orders. Every “while you’re at it” is a budget event: write down what’s changing, get the cost before you say yes, and decide where the money comes from.
- Contingency draw-down. Log each dip into the contingency and what it was for, so you can see whether you’re on pace or burning it by week three.
- Progress photos. Especially of anything about to be covered up — pipe runs, wiring, waterproofing. You will want those photos one day.
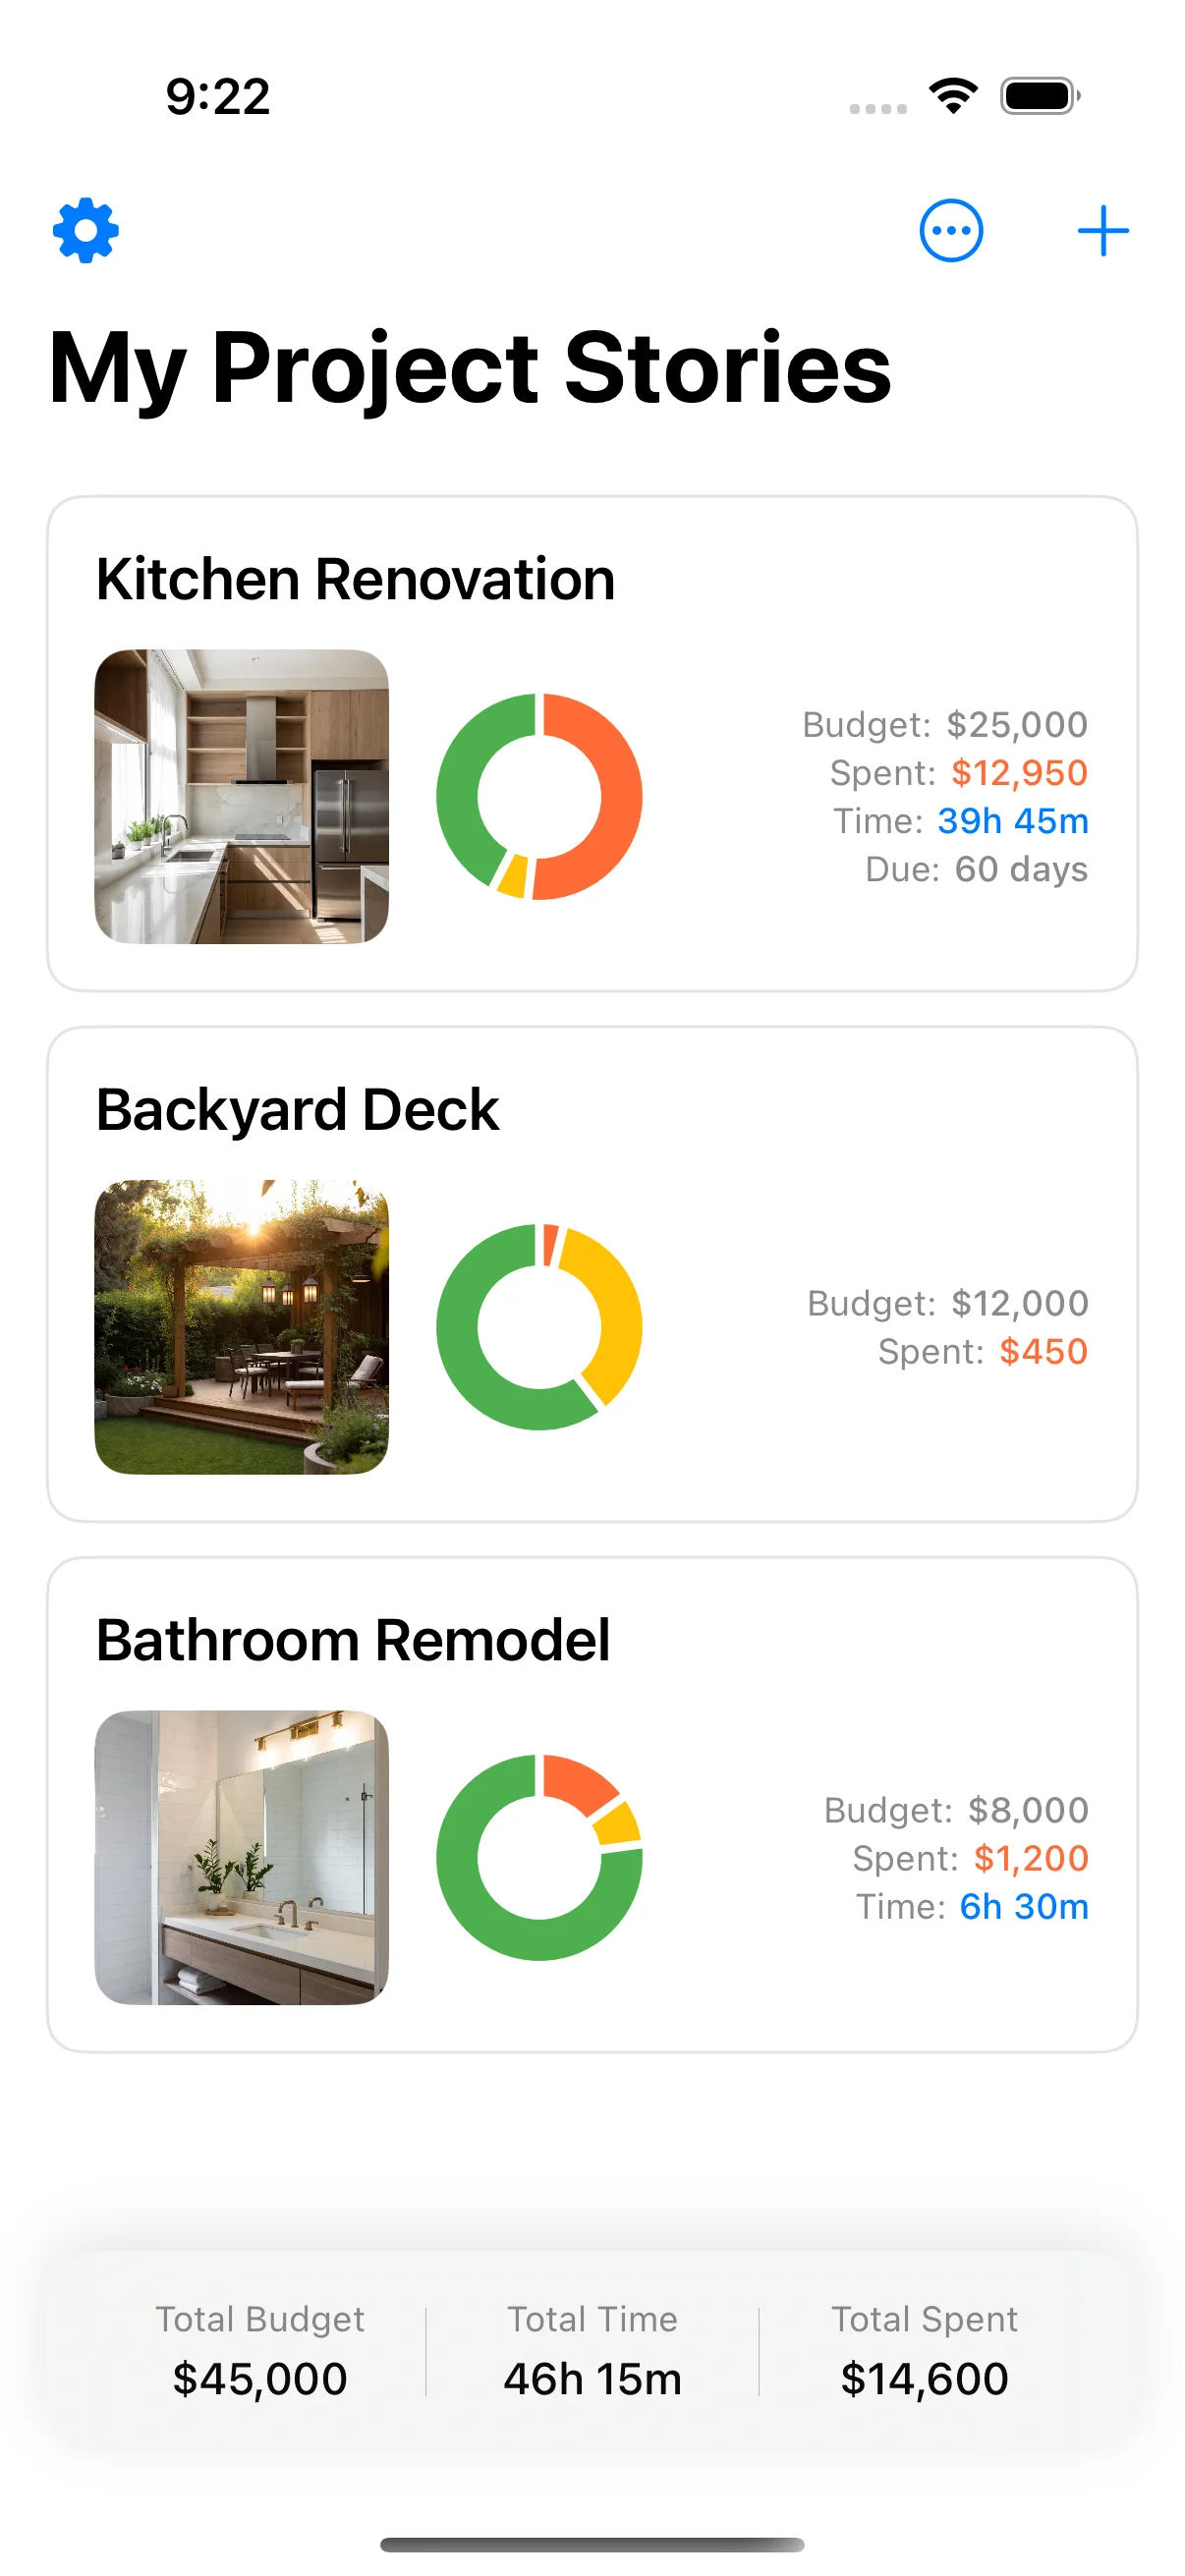
This is precisely the phase where a planning spreadsheet stops working: you’re on site, one-handed, in the dust, and a desk tool just doesn’t get updated. Home Stories was built for this half of the project — log a receipt at the merchant in ten seconds, snap a photo against the right line item, and always know where you stand. It’s free on the App Store.
Phase 6: Finishes and fit-out
The structural and rough work is done; now the space becomes a room. Painting, flooring, tiling, lighting, kitchen and bathroom fit-out, trims, handles, and the decoration layer that finally makes it feel finished. Psychologically this is the rewarding phase — you can see the end.
It’s also where two quiet budget risks live. First, the finishing layer (paint, trims, blinds, furniture) is routinely left out of the construction quote and forgotten in the budget. Second, this is peak temptation for last-minute upgrades — the nicer worktop, the upgraded tap — exactly when you should be protecting what’s left of the contingency.
What to track: the finishing-layer costs that don’t appear on the contractor’s invoice, and any late material upgrades against your remaining budget. This is the phase where small “just this once” decisions add up to real money.
Phase 7: Snagging and handover
The phase everyone wants to skip, and the one that protects you. Snagging is the deliberate walk-through of the finished work to list every defect, unfinished detail, and fault — the chipped tile, the door that won’t close, the missing bead of sealant — before you sign off and release the final payment.
A written, photographed snag list is your leverage. Defects are far easier to get fixed while the contractor still expects to be paid than after the money has cleared. Handover is also when you capture the things you’ll need for years: warranties, guarantees, paint colours and product codes, appliance manuals, and “as-built” notes on what’s behind which wall.
What to track: the snag list (with photos and a fixed/not-fixed status for each item), retained or final payments tied to completion, and a permanent record of warranties, documents, and key specifications. A renovation isn’t finished when the work stops — it’s finished when the defects are closed and the records are filed.
The pattern underneath the phases
Two truths run through all seven phases.
The first: problems are created early and revealed late. Overruns and delays are mostly baked in during the desk phases (1–4) — a scope that was never frozen, a budget missing the hidden third, a contract that didn’t pin down what was included. They just don’t become visible until the build (phase 5), when it’s far more expensive to fix. The cheapest place to prevent a phase-5 disaster is in phase 1.
The second: the thing worth tracking changes as you go. Scope and decisions early. Itemised budget and contingency once costs are known. Actual-vs-estimate, change orders, and photos during the build. Defects and documents at the end. A tool that only does one of these — a planning spreadsheet, a contractor’s email thread, a shoebox of receipts — leaves the others uncovered.
That’s the case for keeping the whole arc in one place. Home Stories holds all seven phases in a single project — scope, budget, line-item tracking, change orders, photos, and a PDF report at the end — so nothing falls into the gap between phases. It’s free on the App Store, and it’s built to carry a renovation from the first sketch to the final signed-off snag.
Frequently asked questions
What are the phases of a home renovation?
A home renovation moves through seven phases in order: (1) planning and vision, (2) budgeting and financing, (3) design and permits, (4) hiring and contracts, (5) demolition and construction, (6) finishes and fit-out, and (7) snagging and handover. Smaller projects compress some phases, but the sequence is the same — and skipping a phase doesn't remove the work, it just moves it to a worse moment later in the project.
Which renovation phase takes the longest?
On the calendar, demolition and construction (phase 5) is usually the longest stretch of physical work. But the design, permits, and hiring phases (3 and 4) often take longer in elapsed time than people expect — permit approval and getting good contractors booked can add weeks or months before a single wall is touched. Budgeting realistic lead times for phases 3–4 is one of the most common planning mistakes.
What should I track during a renovation?
Track different things in different phases: the scope and your decisions early on, the itemised budget and contingency once costs are known, then — during the build — actual spend against estimate per line item, change orders, and progress photos. At handover, track outstanding defects (the snag list), warranties, and final documents. The mistake is tracking only spend; the scope changes and undocumented decisions cause just as many problems.
What is the snagging phase of a renovation?
Snagging is the final phase, where you walk the finished work and list every defect, unfinished detail, or fault — chipped tiles, a door that doesn't close, missing sealant — before signing off and releasing final payment. A written, photographed snag list is your leverage: it's far easier to get defects fixed while the contractor still expects to be paid than after the money has cleared.
Can you skip phases in a small renovation?
You can compress them, but not skip them. A single-room refresh might fold budgeting, design, and hiring into an afternoon, and need no permits at all. But the phases still happen in sequence — you still decide scope, set a budget, choose materials, do the work, and check it. Trouble starts when people skip the deliberate version of a phase (a real budget, a written contract) and end up doing the accidental, expensive version instead.
Keep reading
How to Budget a Home Renovation Without Going Over (2026)
How to budget a home renovation without going over: a step-by-step 2026 method using real quotes, the right contingency, and tracking that survives the build.
Renovation Budget Template (Free PDF + Google Sheet)
A simple renovation budget template that actually works — line-item, contingency-aware, and proven on real projects. Free PDF and Google Sheet.
Why a Spreadsheet Stops Working Halfway Through Your Renovation
Spreadsheets are great for planning a renovation and terrible for surviving one. Here's exactly where they fail — and what to replace them with.